If you ever had a failure on a new heater core that you had just replaced for less than a year, then this might be a symptom of electrolysis corrosion on the cooling system. Another symptom from this condition might be a failure on the radiator from the inside out that is caused by corrosion or pitting on the material.
Late-model vehicles are the ones that are more prone to have corrosion from electrolysis. This is because most new vehicles will have heater cores and radiators that are made with aluminum. Electrolysis itself is a chemical reaction that happens when a coolant meets any metal surface. On cooling systems for newer vehicles, aluminum is the most vulnerable material that will be affected by this condition. The specification of aluminum makes it softer than most metals and more reactive to acids and electric currents from the coolant.
The corrosion from the electrolysis process might be able to damage the heater core, radiator, and other components that are made with aluminum. It also includes a water pump and passageways inside the cylinder heads. This condition might be caused by the fact that the coolant has not been replaced in a long time or there are stray electrical currents from the damaged or missing coolant.
You might want to use a voltmeter if you want to find stray electrical currents that might be the cause of electrolysis corrosion in your vehicle’s cooling system.
Some Symptoms from Electrolysis Corrosion of The Cooling System
The easiest way to find the possible electrolysis corrosion on the vehicle is to find a leak on the coolant from the heater core. There might also be an appearance of dark-colored pinholes around the heater core. If the vehicle is experiencing coolant leaking, you might also be able to notice wet spots or dark stains on the passenger side carpet on the floor. The vehicle AC and heater vents might also let out steam or greasy vapor when you turn on the heater or the defroster. If you let this condition in a prolonged state, the coolant level will become lower than it should and it will push the engine to overheat a lot easier.
If the coolant is leaking from the radiator, you might be able to notice some small black pinholes appearing on some parts of your radiator. The pinholes are the result of the leaking due to electrodes corrosion that has damaged the metal material from inside the radiator.
The damaged condition on the intake manifold gasket connections might also be the cause of coolant leaks. One of the most common reasons for the situation is the softening of seals on some gaskets from prolonged use. Another reason is the corrosion from the coolant that eats away the coolant ports located in the intake manifold and the cylinder heads.
If the corrosion has broken enough mental material, the intake manifold gasket may not be able to work properly to support the seal and will allow the coolant to seep through. You may not be able to simply replace the intake manifold gasket because the corrosion might leave a wider sealing area that will also require a wider replacement gasket. The usage of high-temperature metal-epoxy might also be needed to close the ports that have been eroded by the corrosion. The epoxy might still need to be sanded out so it can seal the intake manifold gasket in the correct manner.
Failures on the Heater Core
There is also a chance that the heater core will experience failure when there’s a physical erosion that is not caused by electrolysis. This type of erosion can be caused by dirt and other deposits that circulate along with the coolant. The dirty condition of the coolant is actually one of the most common reasons for damaged condition on the heater core. The contaminants that circulate along with the coolant will be able to wear away the metal material inside the component which will eventually lead to a coolant leak. It will also damage the plastic end tanks on the radiator or the plastic impeller that is being used for the water pump. This is because the contaminants will have an abrasive effect that can damage any material, including metal or plastic.
Failures on the Radiator Hose
Electrolysis corrosion can also lead to failure of the radiator and heater hose connected to it. Even though rubber for the component, it will still be affected by the coolant. Coolant and rubber can react electrochemically which will cause the material to crack and fail in the long run. This condition might be indicated by cracks and pits that are created along with the hose that has been affected by electrolysis corrosion.
The Possible Causes for Electrolysis Corrosion on The Cooling System
There are two possible causes for electrolysis corrosion on the coolant system, including:
The low-quality of coolant. This is usually caused by the coolant that has not been changed for a prolonged time. The condition of your coolant will get lower over time especially if you don’t change them regularly. Normally, the coolant will need to be replaced after two or three years of usage or 30,000 to 50,000 miles of travel. Corrosion might not happen until about five years of usage or 100,000 miles of travel with coolants that are formulated with long-life OAT and HOAT. But, if the court has not been changed in a long time, the material will turn from alkaline to acidic which will eat away the mental material on the cooling system components. Over time, the coolant might be leaking and seep through the metal components.
Uncontrolled electrical currents inside the coolant. A coolant with low quality will become more conductive compared to a new coolant. This can be a reason for stray electrical currents inside the coolant system, especially if there is a ground connection from the electrical system to the vehicle’s charging system. This type of electrolysis corrosion can also be caused by broken or missing straps for ground connection between the engine and the chassis.
Checking the Electrolysis Corrosion
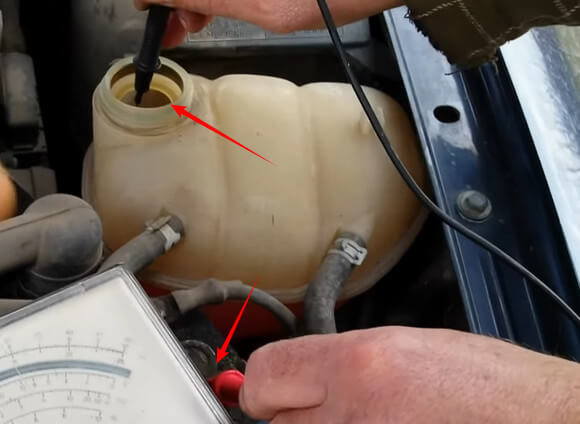
You can use a digital voltmeter to check for electrolysis corrosion by turning on the engine and checking the voltage between the coolant at the negative side of the battery. To do this, you can remove the radiator cap and carefully insert the positive side of the voltmeter into the coolant. After that, you should also connect the negative side of the voltmeter to the negative side of the battery. If the tool shows zero reading, then you can be sure that there are no stray electrical currents inside the coolant. But, if the tool shows higher than 0.300 V, then the coolant might be in a lower condition and there is a potential for electrolysis corrosion.

You can be sure that the condition of your coolant is good and there’s no potential for electrolysis corrosion if the voltage reading between the negative side of the battery in the coolant reservoir is less than 0.300 V.

Another way to check the possibility of electrolysis corrosion is to check the alkalinity level of your coolant. You can do this by using a chemical test strip that will change color when it detects a high alkaline level in the coolant. These chemical test strips can be bought from a lot of auto stores around you. After using this tool, you can see if the coolant is acidic or alkaline and if you need to replace your coolant.
How to Eliminate the Electrolysis Corrosion on The Cooling System
If you haven’t replaced your coolant in more than five years, then you might need to drain and flush the whole cooling system before refilling with a balanced mixture of distilled water and a new long-life coolant. Please remember to not use tap water or softened water for the mixture because minerals in the water are corrosive and will be able to shorten the life of components that will prevent corrosion in the coolant system. You can also improve this system by using antifreeze material that has been mixed with distilled water in the correct proportion.
You should also fully flush your cooling system if you find any deposit or sediment in the old coolant. You might need to use a chemical cleaner product to do this job. To use it, you will need to insert the product into the radiator and turn on the engine and let it run for a while until it is warm. Then, you will need to drive your vehicle and turn on the heater so it will push the cleaning to circulate around the heater core components. You will need to do this for about 10 minutes until all the deposits and sediments are cleared from the system. Finish the job by draining the radiator after turning off the engine and letting it cool down.
Make sure that you always read the instructions on the cleaner product before using it to flush and clean the coolant system. You should also clean the system with distilled water after the cleaning process to remove all traces of deposits from the components. Always check that the water that comes out from the radiator drain valve is clean to make sure that the cleaning process has been done properly.
Another thing to check is the condition of the engine ground straps to ensure the tightness and proper installation of the component. You might also need to remove and clean this component before reinstalling it to ensure that there are no stray electrical currents.
There are also some special cases where stray electrical currents occur when electrical accessories such as media players and lights are not grounded properly to the chassis.