There are many reasons why some people want to rebuild a car engine, but the main reason is usually centered on the fact that it is a better alternative compared to buying and replacing it with a new one. While rebuilding a vehicle engine can be a daunting and heavy task, with thorough research and proper planning as well as enough preparation, this job can always be done flawlessly.
The difficulty level of the rebuilding process will really depend on the exact type of engine that you want to work on. And since there are many types of engines out there, we’re just going to focus on rebuilding an engine with a classic pushrod style. This type of engine can be identified by the usage of a V-shaped engine block. Other features of this engine include a camshaft that is placed on the block and the pushrods that are used to actuate the cylinder heads.
Compared to other types of engines, pushrods are easier to maintain, have easy access to spare parts, and are relatively more reliable for heavy usage. Those reasons are probably why this old engine is still a very popular choice to this day. This how-to guide will show you step by step on what you should do to rebuild a pushrod style engine.

Research and Preview the Removal Procedure
The very first thing to do for this job is to completely understand the removal and rebuild procedures involving a specific type of vehicle. All necessary tools also need to be gathered as well.
Even though most pushrod V8 engines are very similar to each other, it’s very wise to know which specific type that you’re working on. While they are pretty similar, some details might still be different.
Purchasing a manual is also an advisable move. You can always find one online, which will explain the exact procedure that you need to do to get a high-quality rebuilt result.
Draining the Vehicle’s Fluids
1. Raise the front of the vehicle.
Raise the front first and then use jack stands to hold it in place. Then, proceed to put the parking brake on and hold the rear wheels with wheel chocks.
2. Use a regular pan to drain the engine’s oil into.
Drain the engine’s oil and the coolant after placing fender covers on both fenders of your car. Be careful when you’re doing this as the two liquids can mix together which can create difficulties when you’re trying to dispose of them.

Prepare the Engine for Removal
1. Plastic covers should be removed first.
Draining all the fluids from the engine can take some time. While you’re waiting, make sure that you uncover any part of the engine that is still protected by any plastic layer. These parts can include filter housings or air intake tubes.
Without removing them, the engine will not be able to be taken out.
When you take them out, make sure to put every single part in a clear plastic that you label with respective names. This is to make sure that no parts will get lost in the process of rebuilding.
2. Remove the radiator.
After all the fluids are removed and no covers are attached, start removing the radiator from the engine.
The brackets should come off first, and then start undoing the upper and lower hoses. Transmission lines need to be cleared off, and then the main part of the radiator will be able to be removed.
This is just a step to prevent the radiator from getting broken during the process of the engine removal in the next steps.
Please note that most vehicles will also have two heater hoses going from the radiator to the firewall, and both of them will need to be taken out as well.
3. Disconnect the battery and starter.
The process can be continued to disconnect the battery and every piece of harnesses and connectors.
Flashlights can be a great help to check if the entire connectors are already swept out and none of them are missed.
The starter also needs to be disconnected. The connector can be found under the engine. If it’s already done, make sure to put it on the side to reduce the disturbance while working on the engine.
4. Remove the starter and exhaust manifolds.
After setting aside the starter’s harness, remove the main part of the starter and unbolt the exhaust manifold. This process will disconnect them from their down-pipe counterparts and also from the engine cylinder heads.
Refer to the manual of your specific engine for this process, as some engines can be taken out while having the exhaust manifold still locked on the engine.
5. Remove the air compressor and belts.
Most modern cars will be equipped with air conditioning. Therefore, there will be air conditioning belts that need to be removed. You should also unbolt the AC compressor from its place.
After unbolting the compressor, you can still leave it connected with the AC line so it can be refilled with refrigerant later in the process.
6. Unbolt the engine from the transmission.
Continue the process by unbolting the engine from its place. The main part is usually bolted tight to the transmission bell housing.
Use a jack to support the transmission and then remove all parts of the bell housing bolts.
Again, use clear plastic bags to mark and identify each small piece that you take out to avoid confusion later on.
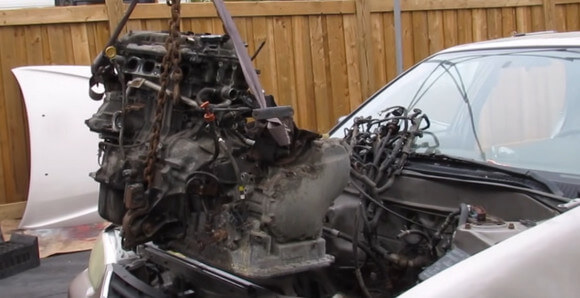
Removing the Engine from the Vehicle
1. Prepare the engine hoist. Use an engine hoist and position it over the main part of your engine, and then secure the whole thing with chains that are attached in the correct positions.
Some engines are easier to work with since they have hooks or brackets to act as placeholders for the hoists. Others might need some additional bolts and washers to secure the position of your chains.
When you remove the engine using bolts, make sure that the quality of bolts is good enough to hold extremely heavy loads. It will ensure that the whole chain can support the engine weight.
2. Unbolt the engine from the motor mounts. After securing the hoists and the chains, continue the process by unbolting the engine and disconnect it from the motor mounts. If possible, let the motor mounts still attached to the vehicle frame.
3. Lift the engine out carefully. If everything that needs to be removed is removed, and all the chains are securely in place, the engine should be able to be pulled out. Double check any connectors or hoses that might still be attached. And then, continue to lift up the engine.
Lifting slowly is the key here and try to maneuver the engine away from the vehicle. If the engine is too heavy, get an assistant from someone to help you and to ensure your safety.
Mounting the Engine onto the Engine Stand
If you can, always place the engine on a proper engine stand. Mount it on the stand to ensure a safe place to work on the engine.
The usage of multiple hoists, bolts, and washers is again needed here to help the engine stay still and be secured.
Again, the engine can weigh a lot, so make sure to only use bolts with high-grade specifications.
Disassembling the Engine
1. Remove all belts and accessories. The disassembly process can then be continued after the engine is mounted safely.
Start the process by removing the entire engine’s belt and other accessories that may still be attached to it.
Then, remove the wires along with the distributor, oil pump, water pump, power steering pump, alternator, and other pulleys that may be available on the engine.
Store and label all the removed hardware properly to make the reassembly process easier when you’re done with the disassembly.
2. Remove the bare components of the engine. After the engine is stripped from the small accessories, continue to remove the intake manifold. This also involves the process of getting rid of other stuff, such as the oil pan, timing cover, rear engine cover, as well as valve covers from inside the engine.
The remaining oil that didn’t get dried out completely in the previous step should also be drained into a pan. You should also keep a pan underneath the engine in case there are some oil drops. And we can’t mention enough how important it is to label everything when you take them off from the engine.
3. Remove the rocker arms and pushrods. The valve train of the cylinder head should be disassembled first. You can begin by removing the rocker arms and pushrods. The access should be easier now that they have been exposed.
Check for the form of rocker arms and pushrods after you take them off. Inspect them to see if they have been too worn out or there are bends on the material. Also, check the condition of lifter retainers and filters to know if you need to replace them.
Double check the valve train components as well by removing them from their housing. Any components that are damaged or impaired will need to be replaced.
Since pushrods engines are relatively common, these parts are also pretty easy to be found in automotive care stores.
4. Remove the cylinder head. After the main engine part is free from the pushrods and the rocker arms, you can continue to remove the cylinder head bolts.
To remove the cylinder head bolts, do it in an alternating fashion, which is first from the outside, and then change it from the inside. This step is to make sure that the head isn’t at risk of getting warped when the torque is released. After that, remove the cylinder heads altogether from the engine block.
5. Remove the timing chain and the camshaft. When you open the engine, you’re going to see the sprockets and timing chain that connect the camshaft to the crankshaft. Remove these parts one by one until you can remove the camshaft.
The usage of a timing gear puller can be useful on sprockets that are hard to be removed.
6. Remove the piston rod caps. Removing the piston rod caps can be done by rotating the engine upside down first. There are multiple piston rod caps inside the engine, so you’ll need to remove them one by one. The caps are usually in sets so keep them together when storing them temporarily.
After you remove all of those caps, rod journal protectors need to be placed on the connecting rod studs. Scratching can happen on those rod studs and that’s why covering them is important to keep in pristine condition.
7. Clean the top part of each cylinder. When each and every single one of connecting rod end caps have been taken off, to clean up the engine from carbon build-up that can form deposits on the top part of cylinders use the cylinder ridge reamer. After that, you can pull out the piston.
Pay attention to where the cylinder walls are to prevent getting scratches on them.
8. Inspect the crankshaft. Most of the engine parts should now be removed, leaving only parts of the crankshaft.
Rotate the engine upside down again and remove the bearing caps located on top of the crankshaft.
Any signs of damage on the crankshaft journals should be inspected, including any scratches, oil starvation signs, overheating signs, or even just faint scorings.
If you can see that the crankshaft has experienced prolonged damages, bring it to a professional to get it double-checked. If the damages are already too heavy, replacing it might also be a good idea.
Preparing the Engine and Components for Reassembly
1. Start by cleaning the entire components that have been removed. At this point in the project, the engine has been disassembled completely.
Pick out the main parts first, which are the ones that are going to be reused, and lay them down in a place that’s easy to access. These parts include crankshaft, camshaft, rods, pistons, front and rear covers, and also valve covers. Make sure to thoroughly clean each and every single one of them.
Gasket material needs to be washed off before reassembly. You can do this by washing the parts that have gasket material on them with a solution of regular detergent and warm water. Make sure they have completely dried off again before installation.
2. Clean the engine block. Clean the engine block to prepare it for the reassembly process. Gasket material can also stick on the engine blog as well, so use the same detergent and warm water solution to clean it. Check the block and heads again to find any signs of possible damages. Compressed air should be then used to completely dry the whole area of your engine block.
3. Inspect the cylinder walls. After the engine block is dried off, use a flashlight to find any small cracks or scratches on the walls of the cylinder.
Some scratches can get pretty advanced and will need to be checked out by a machine shop. Ask them if you might need to replace the cylinder walls.
Honing is also advisable to make it easier for you to seat in the piston rings again. When doing the honing process, spray a thin layer of water displacement lubricant to prevent rust from forming on the metal.
4. Replace the engine’s freeze plugs. Continue the job by removing each of the remaining engine’s freeze plugs.
Softly tapping one edge of the freeze plug with a brass punch or rubber hammer should help with taking off the old freeze plug. You can then pull them off with the help of small pliers.
Installing the new freeze plug is also about the same process. You just need to place them by tapping softly on the top part until they are snugly placed in their slots. Make sure that their position is flush and even. After that, the main engine block is ready for the reassembly process.
5. Install new piston rings. Prepare the pistons first by installing the new piston rings. They are usually included in the piston kits that you buy.
Since piston rings are designed for a specific function, you will need to follow the included instruction closely. Engine issues can ensue later on in the engine life if the piston rings are not installed correctly.
6. Install new camshaft bearings. Use the camshaft bearing tool to install the new bearing for this part. A generous layer of lube is also needed for this to ensure a smooth working mechanism when the engine is being used.
Reassembling the Engine
1. Reinstall the parts starting from the main bearings, crankshaft, and their respective caps. Use the chain system again to rotate the engine upside down one more time. You can then continue to install all the parts mentioned in this point.
Make sure to use lots of lube on each bearing and journal because the lack of lube can cause damages to the bearings.
Find the rear bearing cap and install it well.
When all the caps have been installed correctly, you can torque each cap according to their specification. Do the process in a correct sequence manner, because incorrect installation procedures can lead to damages to the crankshaft.
You can test if the installation is correct by rotating the crankshaft by hand. If it turns smoothly, then the installation is correct and you can move on to another step. Always refer to the official manual if you have problems with the process at this point.
2. Install the pistons. With the caps safely tucked, pistons are ready to be installed. Put in the new bearings on the rod first and then the pistons.
Since piston rings are designed to move outwards like regular springs, use the cylinder ring compression tool on them to compress the form. After that, you can lower the piston down the cylinder. Make sure to place them onto the correct crankshaft journal.
After making sure that the piston is fully lowered in the engine and the bearings have been installed on the crankshaft journal, you can rotate the engine back and turn it to its normal orientation. Afterward, install the rod end caps one by one on the piston.
You need to repeat these steps until all the pistons are soundly installed.
3. Install the camshaft. First, take a generous amount of lube and apply it onto each one of the camshaft journals and cam lobes. With that done, lower those into the engine block while making sure that no scratches are created in the process.
4. Install the timing components. The timing components will be the next part to the engine. Then, you can continue with other similar parts, such as crank sprockets and timing chains.
After installing the new sprockets, clock them correctly based on the instructions provided with the manual that comes with the timing kit.
On most pushrod engines, the process usually involves simple steps to turning the cam and crankshaft to the point of bringing cylinders at TDC. If done correctly, you’ll notice the marks on the sprocket that lines up with a particular point in a certain direction.
5. Test the crankshaft. If you finished the previous step, then the assembly should be fully done by now.
You can test the crankshaft by turning it by hand a few times. This will verify if the cam and crank sprockets are installed correctly. Afterward, install the timing chain cover and close the build by putting it on the rear engine cover.
Also, replace any old seal or gasket when you reinstall the engine covers.
6. Install the oil pan. Bring the engine back to the upside-down orientation and install the oil pan. Using a gasket is needed to prevent the oil from leaking out. Use the ones that are included in the rebuilt kit.
On the edges where the pan and gaskets meet, apply a thin bead of silicone gasket maker to make the build more secured.
7. Install the new head gaskets and head. After the whole part of the lower end has been assembled, the job can now move to the top part.
New head gaskets are usually included in the rebuild kit. When you install them, take great care in making sure that the orientation is correct.
After the gaskets are secured in the right place, install the heads and then continue with the head bolts.
8. Reinstall the valve train. You can begin by installing the lifters and then the guide retainer. The pushrods and rocker arms can follow next.
9. Install cover and intake manifold. Proceed with installing the valve cover and then the rear engine cover. The last thing from this part is the intake manifold.
10. Install the remaining parts, such as the water pump, flywheel, and exhaust manifolds. After doing this part, then the engine should be fully reassembled.
Reinstalling Engine into Vehicle
1. Using the hoist, mount the engine back into the vehicle. After following all the steps above, the engines should now be ready to be reinstalled.
Use the hoist to hold the engine and then insert the whole block back into the vehicle. The order should be the reverse of the steps that are explained in steps to “Prepare the engine for removal”, particularly section 6-12.
2. Reconnect the engine. After the engine is mounted, put the hoses and electrical connectors back to where they belong and reconnect them. Also, fill the engine back with oil and coolant to ensure it will work properly again.
3. Test the engine. After everything is reconnected and refilled, you are ready to start the engine again and make final checks. Notice how the engine sounds and how it performs. Always refer to the manual if something doesn’t feel right.
The project to rebuild an engine is not an easy thing to do. You will need not only the right tools, but also enough knowledge, preparations, and patience to do the job from start to finish. While it is something that can be done by one person, getting assistance or a second opinion is also advisable.