You can usually notice the leakage from the head gasket when your engine is overheating frequently. This is because the leakage will cause the head gasket to lose the ability to seal the cylinder head, which in turn will lead the coolant to seep through the gasket. The cylinder will be contaminated by the coolant and will cause the engine to overheat excessively. This condition might be hard to notice at first.
There are several reasons why a leaky head gasket is not good for your vehicle, aside from the overheating on the engine. For instance, this condition will push the antifreeze to enter the cylinder and will make the component gets worn easier since there will be no oil to protect the material. Meanwhile, the existence of antifreeze on the cylinder will also dilute the oil, which can result in the damaged condition of the bearing.

How to Tell if Your Head Gasket is Leaking
There are some symptoms that you might be able to notice if your vehicle is experiencing a leaky head gasket, including:
A low level of coolant: If you notice that your coolant level is lower than it should, but you can’t see any leakage outside of your engine, then the coolant might actually be leaking into the cylinder. This can be caused by the damaged condition of the head gasket, which is not visible from the outside.
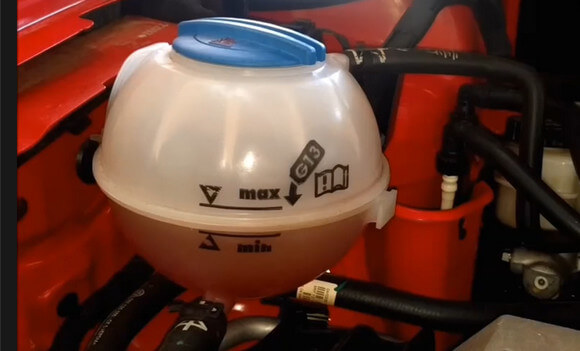
The existence of coolant in the crankcase: You can check this by looking at the oil dipstick. If the level indicator is higher than it should be, then the oil might be contaminated by the leaking coolant. You can also notice the difference in the color of your oil. The coolant that contaminates the oil will turn the oil color into a milky yellowish or brownish substance.
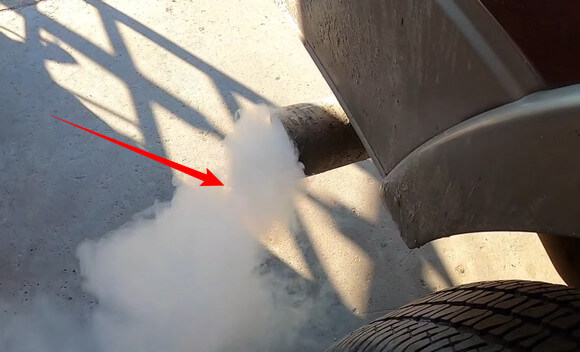
The existence of white smoke from the exhaust: A normal engine will still produce a small amount of white smoke when you first turn your vehicle on a cold morning. But if the engine has been running for quite some time, and it is still producing the white smoke, this might be caused by the coolant that has seeped into the exhaust. You can also notice this problem from the sweet-smelling exhaust smoke.
A fouled condition on the spark plugs can also be a result of coolant leakage. This will lead to an engine misfire. If your vehicle is equipped with an OBD-II system, the vehicle might also set the trouble codes from the P030X series. Your Check Engine Light will also be automatically turned on. You might be able to notice this condition by removing the spark plugs and see if they have deposits on them. If they do, then the reason is the coolant leakage.
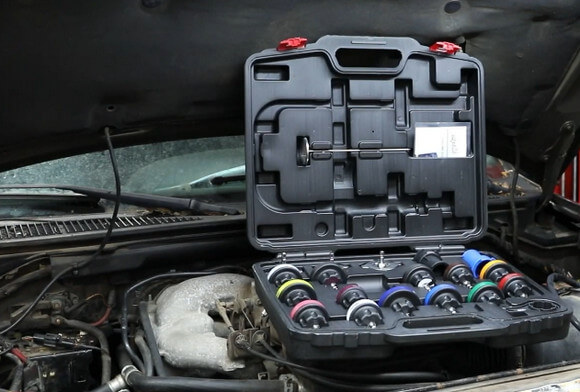
You can also perform pressure testing on the cooling system to check if there are any leaks on the head gasket. A cooling system pressure tester is required for this step. You can connect this tool to the radiator filler neck and read the results. The tester should show a number between 8 to 15 PSI when the air pressure is being pumped into the system. If the tester shows no drops in the reading after about five minutes, then the cooling system is in a good condition. Meanwhile, the tester will show an immediate drop in reading if there’s actually a leakage on the head gasket.
NOTE: Coolant leakage is not the only symptom and reason for a leaky head gasket. A leaky head gasket might also be the result of small cracks in the engine block or the cylinder head.
You might also want to try performing a Leak Down Test to determine and find the location for the leak on the head gasket. First, you can remove the spark plugs that have been misfiring from the cylinder and then insert pressurized air. If you can notice that the air is leaking into the cooling system, then there is a leakage on the head gasket.
Another alternative is to buy a special Combustion Leak Detection kit that will be able to find the leaks on the gasket head by testing the fluid. You can capture the fumes from the radiator into a bottle that has been filled with the test fluid. If the fumes react with the fluid and the fluid color changes from blue to yellow, then it means that there is a combustion leak in your system.
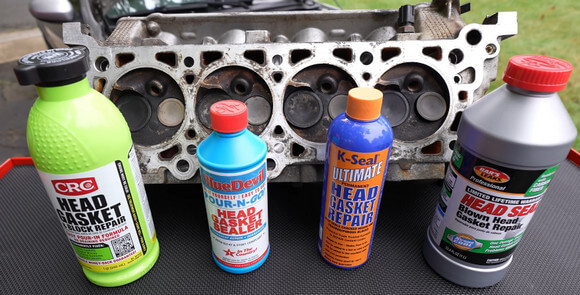
How to Use a Sealer to Temporarily Seal a Leak on the Head Gasket
Adding a bottle of a cooling system is probably one of the least expensive ways to temporarily fix a leak on the head gasket. Another option is to add a head gasket sealer to the cooling system. Those products can easily be bought from any auto store and they will be able to halt the leak of your coolant. While some products may claim that they can provide a permanent repair, that claim has never been proven and it will never stop the leak forever. There will be possibilities where the engine is still experiencing overheat even if you already apply the products for your engine. If this happens, you might need to fully replace the old head gasket with a new one.
If you want to use this method, always make sure that you follow the instructions printed on the product carefully. Most products will tell you that you need to drive your vehicle for at least 30 minutes to push the sealer to circulate around the engine. These products will usually be able to temporarily close the leakage by solidifying in the cracks when they get exposed to other gases.
Replacing the Head Gasket
If there’s still leakage on the head gasket after you use a sealer product, the only alternative left for you is to replace the head gasket. This method is relatively expensive and will require professional help from a repair shop or an experienced mechanic. Replacing head gaskets will usually cost you up to a few thousand dollars depending on the type of engine your vehicle uses. This is because the cylinder heads will have to be removed first before the new gaskets can be installed.
You can also install the head gasket yourself if you can follow the step-by-step procedures carefully. You might be able to get a manual from a shop or an online service to get complete instructions on how to replace your engine’s head gasket.
Replacing the Head Gasket Usually Goes Like This:
- Take away the battery.
- Completely drain the coolant.
- Remove every wiring and plumbing around the intake manifold from the top part of the engine. Always make sure that you mark every component after removing them.
- Take away the exhaust manifold and disconnect it from the cylinder head.
- Remove the timing belt and the chain along with the front engine cover. Make a note of the timing marks on the belt so the components can be reinstalled later in the proper manner.
- Take away the valve cover that is connected to the cylinder head.
- If your vehicle is using a push-rod engine, remove the push-rods after losing the rocker arms.
- Take away all the head bolts and stop using the ones that have been out of specifications. You can also reuse old head bolts if they haven’t been damaged.
- Take away the cylinder head that’s connected to the engine. If you’re experiencing difficulty removing the head, the component might still be connected by one or more head bolts.
- Properly clean the surfaces of the engine deck and the cylinder head. Inspect the condition of those components.
- If the surfaces of the engine deck or the cylinder head are not smooth, take them to a machine shop to get them repaired.
- Clean the surfaces from any gasket residue or oil deposits.
- Put the new head gasket inside the engine block by noting the correct side of the component. Always pay attention to the positioning of the holes in the openings to make sure that they are lined up with the engine block and the cylinder heads.
- Replace the cylinder head back inside the engine block.
- Reinstall the head bolts using a proper manner with a specified torque value. You might need to use the special torque wrench for this step.
NOTE: The step is very important to ensure that the head gasket has been sealed properly inside the block.
- Put other components, such as the valvetrain, valve cover, timing chain or belt, front engine cover, exhaust manifold, intake manifold, along with all the wiring and plumbing back inside the engine.
- Tighten all fasteners back into the specifications for each component.
- Adjust the positioning of the valve lash. You might also need to double-check the alignment of the timing belt or chain.
- Reconnect the battery after refilling the cooling system.
- Test the new head gasket to make sure that everything has been installed correctly and there’s no leak in the system.